My first ikea hack
Monday, May 28, 2012
I'm always drooling over those fabulous Organizer Systems you see on sites like Pottery Barn. Of course, I'm sure that when you add all the daily homework papers and school notices and junk mail you need to go through, even those spaces will lose some of their perfect look, right? Ok, maybe not, but I just can't see shelling out several hundred dollars for this stuff. Just think what kind of camera goodies you can get for that kind of dough!
So, being the cheap thrifty person that I am, I came up with a nifty little hack that works great for our little kitchen corner. Hey, my own little ikea hack! I love that site; if you don't know it and love ikea, go check it out. Ok, so here it is. No wait, I want to point out that the pictures were taken with my iPhone (not my Nikon) while working, so they're not the greatest, but you should get the idea. Ok, so here goes:
 I started out with two FJÄLLSTA picture frames ($14.99 each) and one KVISSLE Wall Magazine Rack ($14.99). I used the black frames to match my whiteboard calendar I already had (I think I bought that at Walmart for around $10).
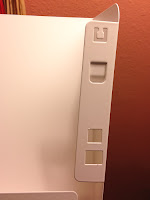
 Then I took two of the racks and used needle-nosed pliers to pry off the little tab at the top.
Since I'm not using the racks as intended (meaning interlocking all of them to make one big rack), I need the hole for a small screw to attach to the picture frame. Make sure the screw is short enough not to go through the frame!
 That's really all there is to it. You could leave the frames as-is and attach them to your wall.
 I used a current school picture for each of the kiddos and put the frame back together. That way everyone knows which frame is their's. (Note, thanks to hubby for being my hand model)
I found that the hardest thing about the whole project was getting it attached to the wall.
And here it is--all finished. Bring on the paper piles :D


0 awesome comments:
Post a Comment