Color Spots November 21, 2011
Sunday, November 20, 2011
Today's Color Spot is a cute idea for an Advent Calendar: Hats and Mittens, available at Garnet Hill.

Read more...
Photo Challenge - Autumn Splendor
Monday, November 14, 2011
It's been a while since I entered anything for the i Heart Faces Photo Challenges, but this picture seemed appropriate, since it was one of the first Fall pictures I took with my new 50mm 1.8. That, and Katie actually posed for me, instead of doing her usual wiggling/hopping/fake smiling bit. Yay, my little girl is growing up. :D


I had a hard time picking just one, cause I really like this one, too ^__*
Read more...
Color Spots 14 November 2011
Now, I'm not usually one to go for cutesy chachkies, but I saw these Christmas Salt and Pepper shakers at the Pottery Barn and they looked more like Holiday decorations. Well, that's my story and I'm sticking to it ^__*
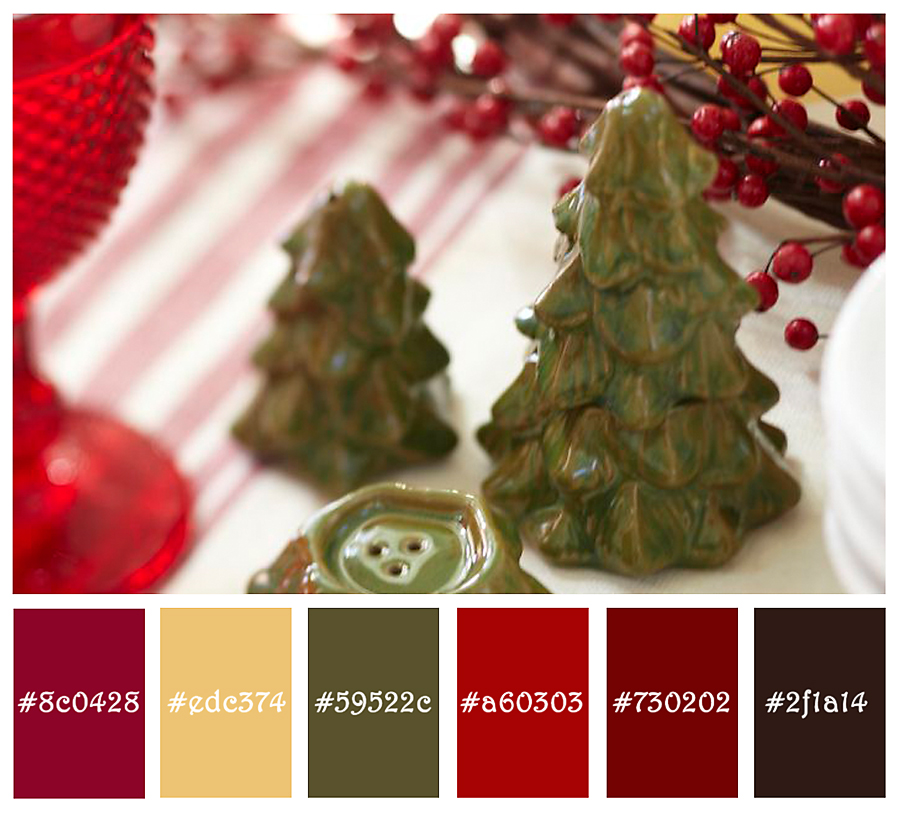
I love those holiday colors, don't you?
Read more...
Color Spots November 12, 2011
Saturday, November 12, 2011
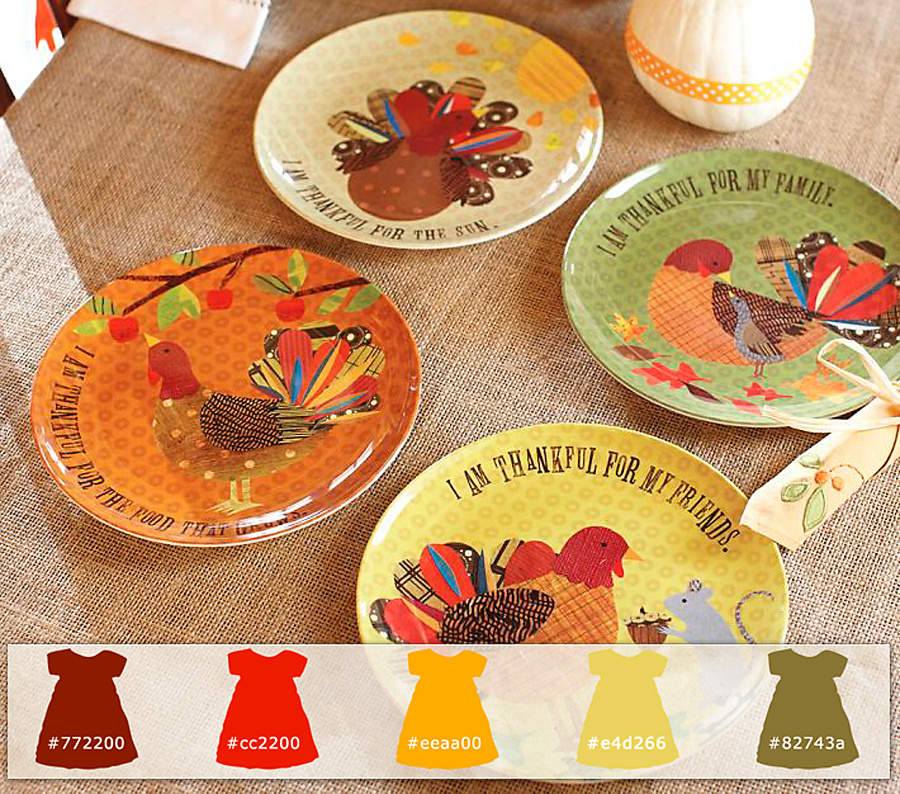
Looks like everyone is skipping the Thanksgiving decorations and getting out the Christmas stuff already, so here is some gift wrap to get started. These are from the World Market site and I had a really hard time to pick just these few.

Now, I'll just need something to wrap...
Read more...
Geeky Faves
Saturday, October 29, 2011
This edition of Pinteresting picks features some pretty cool gadgets I would love to own--especially the Jawbone Up when it comes out (provided it doesn't blow the budget of course). Enjoy--the links are below.
On a blogging-tip side note: I recommend getting your links before you start your post. I just made the mistake of thinking I could just copy them off the page--and promptly got side-tracked by new pins o__O

- For a clutter free desk-- a pretty USB Tulip Hub.
- The ORB is a mobile headset that doubles as a ring and displays messages. How cool is that?
- This Expandable Surge Protector lets you widen the outlets so you can use all of them.
- Audio Light Bulbs are wireless, illuminated speakers. Plug your iPod/iPhone (or music player) into the transmitter to play back your tunes--and it's also a 60W lightbulb!
- The Jawbone Up is a new gadget that tracks calories burned, steps, movement (at night, as in how many times you get up) and transmits the data to your mobile device.
Color Spots Oct 27 2011
Thursday, October 27, 2011
Since I started this Color Spots category, I'm seeing color inspiration everywhere.

Read more...
Preserving Memories
Wednesday, October 26, 2011
Nick is doing a Family Heritage school project and he asked his Grandma for old family names and pictures for his Family Tree. She was able to come up with some great photos, but like all really old family photos, some of them are in not so great shape.
Well, it just so happens that I was checking out my friend Janine Smith's new Photo Restoration with Photoshop course on Lynda.com. Perfect! That was just what I needed.
Here's a before and after of my first processed photo. I picked one of the less damaged ones; it had some stains, creases, a small tear and lots of little spots. I was able to pick up tons of great tips on how to deal with just about every damage you can encounter on a photograph. Even if you don't have really old photos which require restoration, this course can just as easily be applied to everyday fixes, such as glare from glasses, unwanted objects in the background, color corrections, and...and...and... I could go on and on, but just go and check it out, you will love it. Check out Janine's website, Landailyn for a whole gallery of her amazing restoration work.
Ok, here it is. I think it looks pretty good.

The before and after template is from paint the moon photography (I think it was a facebook freebie)
Read more...
Color Spots Oct 21 2011
Friday, October 21, 2011
Here's a great Fall Centerpiece I spotted (get it?) on the Martha Stewart site that looks perfect for this week's color spot. I love fall colors--probably because my Birthday is in October. I ran it through Adobe's Kuler to pull out the color palette.

The ribbon label is a freebie from Pugly Pixel. Check out their other freebies too :D
Read more...
My flickr Faves
Saturday, October 8, 2011
I thought I'd share a nice mosaic of my flickr faves for inspiration. I used the Mosaic Maker app from Big Huge Labs. They have gobs of cool little apps from creating posters to making blog headers. I haven't tried all of them yet, but I'm slowly working my way through them. Anyway, here are my faves. Enjoy!
 |
| Credits: |
| 1. love all a blur, 2. Dinner is Served, 3. Flight, 4. Evi Abeler Photography, 5. 12/365 Pear/Naspati, 6. BACKYARD SWING, 7. Bewick's at Rest, 8. Poppy, 9. Two's Company, 10. lacy nature 5/52, 11. Going solo, 12. Untitled, 13. remnants.......... |
Read more...
Pinterest Picks - Halloween Favorites
Wednesday, October 5, 2011

Well, it's October and we all know what that means--my Birthday! Hehe, just kidding. It is my Birthday this month, but I was, of course, talking about Halloween.
So, here are my Pinterest Picks from my Holiday Ideas Board:
- I really want to make these Pumpkin Cakes, they look so awesome and I do have the little bundt pans.
- Haha these Vampire Pumpkins are so cute and funny and, apparently, easy to make.
- How cute is this little Pumpkin Piggie?
- This is a great idea for those hard, little pumpkins. I never have the right tools to carve these. And you can never have to many candles, right?
- I've done these kinds of toothy Pumpkins before, but not like this beauty. Love those eyes!
Read more...
That's it for Summer
Saturday, October 1, 2011
Looks like Summer's over. One day it was nice and 80 degrees and the next day it was about 20 degrees colder. And soon after, the rain was back. Don't get me wrong, living in the great Pacific Northwest, I like the rain--just not non-stop for, you know, four months or so. I also enjoy nice, cool, sunny Fall days. Which reminds me, I better get started making Nick's Halloween costume. He wants to be Minecraft Steve (don't ask). I tried to get the Steve-Head online, but apparently it's quite popular and was sold out everywhere! But I managed to find some instructions to make it myself--sheesh, what did we ever do before the internet? Well, I better start getting out the Halloween decorations--time flies, right? I've picked up some great ideas on Pinterest already.
In the meantime, here is a shot from our last official summer outdoor cooking extravaganza. Nice, yummy corn to bid summer farewell. I got the idea for the color swatches from the Coffeeshop Blog. I used Kuler to pull the colors from the picture and create my own color swatch. If you don't feel like making your own, you can download Rita's here:

Read more...
On Top of Spaghetti...
Wednesday, September 28, 2011
 Recently, it's been taking a little longer to get meals on the table; not because I take a long time to cook--ok, maybe a little, but because if it looks good, I want to take a picture of it.
Ok, that didn't come out right--I meant if it looks what I call Pin-worthy, I'll want to find a nice plate or bowl and take a couple of shots (maybe a few more than a couple). I'm not saying that our other meals aren't good, or we eat off plastic dishes--not that there's anything wrong with that :D, but I have started a small collection of props for food photos and take every opportunity to try them out.
No one has complained yet; you know, as in family members milling around, tapping their feet, snarling "let's go Mom, make with the picture, we're hungry!!!" but I expect it's just a matter of time. Hey, a girl has to practice to get better at it, right? I managed to get a couple of pictures (and by a couple, I mean two--they're my first--you gotta start somewhere) on Foodgawker (yay), but also have had a fair amount of rejections (boo). So, I'll just keep practicing and submitting and checking out other food blogs for inspiration and tips.
Anyway, here's a shot of my homemade spaghetti and meatballs. One of these days I'll have to write down the recipe--it usually varies a little. Sometimes I use fresh garlic and sometimes I use left-over roasted garlic from my (also homemade) garlic butter.
Ok, all this talk about food has made me hungry. Let's eat!
Pinteresting, isn't it?
Tuesday, September 27, 2011
Since I'm spending such a great amount of time browsing through Pinterest recently, pinning, re-pinning, liking and commenting--not to mention sharing my finds via Twitter and Facebook, I thought I'd start sharing some favorites here on the blog.
If you're not familiar with Pinterest, there is a great article on The Blog Stylist. I don't know how I got along without it, now that I've used it for a while. You know when you browse various websites and see ideas for everything from laundry room organization to web design color lists and you want to mark those somehow? I usually made tons of lists (which I then promptly forgot about) or gobs of bookmarks which got too overwhelming after creating 35 menus and 76 items per menu (I know it's here somewhere, I saved it just yesterday... :p)
I suppose if you get carried away with Pinterest, you could amass loads of Boards and Pins, but I think because it's organized so visually, it will still be easier to find something this way as opposed to traditional bookmarks.
So, for the time being, I'm happily pinning and re-pinning. Here is my board for Favorite Recipies. Take a look. Happy pinning!

Read more...
Back to School - Yay!
Sunday, September 11, 2011
So, I was spending some time on Pinterest--okay, A LOT of time! It's hard to just look around a bit, because it's so darn fun and you always find something interesting, fun, cute and stuff you think must have, that I usually end up spending hours pinning and re-pinning. If you haven't tried it, go check it out. It's great.
Anyway, one of the pins that caught my eye was about organizing school papers. Wait, what? I NEED that, like, NOW! So, off I went--following that pin to a wonderful blog called iHeartOrganizing, where I promptly spent several hours looking around and ending up planning all sorts of projects to organize my house.
Ok, back to the article on Organizing School Paperwork; it's a neat way to file all those papers you're constantly looking for (hmmm, which pile did I put that in?) and the article is sooo well written and also has great pictures to show the process. And, if that wasn't enough, you can download the templates for the Labels and cover sheet.
I couldn't find any of the nice file boxes locally and was too impatient to order them online and wait for them. BUT, I did find 1/2 boxes at Office Max which are super cute and don't look like filing/storage boxes at all. Take a look, what do you think?
I scanned in all the school pictures for both my kids, a task I had planned to do anyway, so now I had a good reason to move that up on my To-Do List. I downloaded the template and opened it up in Photoshop. Since I had seven pictures to process, I decided to place the first image as a Smart Object on a new layer and then clip the layer to the template (background) and mask out everything but the picture. After printing the first sheet, preparing for the next one is easy. You just right-click the picture layer (the Smart Object), select Replace Contents and pick the next picture when prompted. You may need to adjust your Layer Mask a bit and you'll need to change the Teacher's name and school info as needed.
I could stop here and call this project finished, but I wanted to be able to quickly know which binder is which, so I used the template for the folders and changed the dimensions to make it narrow to fit the spine for the binder. I also removed all information except for the name and--voila--individually marked Binder Spines!
I saved the Photoshop file for the Spine-sheet as a template and would like to share it, but I will contact iHeartOrganizing first to ask if she would mind--it was her original template after all. :D
So, that's it--on to the next project.


Contest Extended to September 6th
Monday, August 29, 2011
Well, just as I updated my blog with the MyMemories Suite Giveaway, I discovered that MyMemories decided to launch their new Facebook Page that same time with lots of giveaways (including the software) for new fb friends. So, my little blog contest seemed to have gotten lost in all the exitement :(
So, I decided to give it another shot and extend my deadline to Tuesday, Deptember 6th, 2011. Check the orignal post for giveaway details.
To the readers who participated thus far, thanks a bunch for hanging in there!
Read more...
Summer Yummies
Sunday, August 28, 2011
Now that it appears as though Summer has finally arrived in the Pacific Northwest, I'm taking every opportunity to get some outdoor shots before the rainy season returns.
So, when I saw beautiful sunlight this morning, I grabbed my little table, my tripod, and my camera and set up on the front porch. I had just bought some lovely little mini watermelons and decided to cut them up and prepare a little summer fruit snack. No recipe, just yummy fruit :D

Read more...
Giveaway: Win Digital Scrapbooking Software
Monday, August 22, 2011
The nice people at MyMemories.com sent me a copy of their super easy Digital Scrapbooking Software to review and a great opportunity to pass along some sweet offers.
Years ago, like many, I used to do Paper Scrapbooking, but with two kids and two sets of grabby-fingers, keeping track of all my supplies during the short nap times, not to mention removing all sharp objects from view, was becoming waaay too much work.
Enter Digital Scrapbooking!! Having all your stuff on your computer is wonderful and if you have a laptop, you can even take it with you--how great is that! You may have seen some of my Digital Layouts I've done over the years here on my blog or in my flickr stream. Some of them are pretty detailed and took layers upon layers to complete. I started out with Photoshop Elements and eventually moved on to the full version Photoshop.
Lately, I like to spend more time taking pictures and making them look their best, which means I spend a lot of time in Lightroom and Photoshop; so anything that can save me time and make it easy to put my pictures in digital layouts is great news for me.
I'll be doing more detailed testing of MyMemories Suite in the coming weeks so check back often, but just after watching a short youtube video to get started, here is a Layout I put together in almost no time at all:
Not bad, right? This was just a quick-n-easy one. You can do so much more, like your own custom layouts, adding music, narration and video to your pages. The program comes with a pile of layout templates, background papers, embellishments, word art and, of course, you can get more supplies at the store--even freebies from some of your favorite designers (hello Vera Lim--love her)! The output options include printing, export to jpeg (this is good for saving individual pages for the web), even calendars. You can create Interactive Albums and save your creations as DVD movies. I can't wait to see what else I can do with it. Come back and check my Reviews Page for more updates.


With My Memories Suite you can even create and share professionally printed and bound calendars, send greeting cards to all your friends, make posters or trading cards for your son's soccer team, post a movie of your scrapbook on your Facebook page-all with the click of a button. If you are serious about creating the ultimate scrapbook that preserves and shares your memories with a serious amount of "wow" factor, then My Memories Suite is the one-stop solution for you.
Now, here is some great news for you.
ENTER TO WIN FREE DIGITAL SCRAPBOOKING SOFTWARE
Here's what you can win:
- Enter to win a free copy of MyMemories Suite 2.
- Comment. To qualify, go to the MyMemories website, check out the gallery and store and then come back here and leave a comment. Tell me about your favorite digital paper pack or layout and what software you currently use for DigiScrapping.
- Like NKM photos: Like my Facebook Page. I have free stuff there too, like textures you can use for layouts.
For Extra Entries:
- Like MyMemories on Facebook
- Follow NKM photos on Twitter
- Follow MyMemories on Twitter
Here is the Fine print:
- The Giveaway starts on Tuesday, August 23rd, 2011. The winner will be selected via random.org on the evening of
Sunday, August 28th, 2011Tuesday, September 6th, 2011. - Be sure to add a comment for each one of the extra entries to increase your chances of winning. One entry per 'extra' please.
- This giveaway is void where prohibited by law.
But wait, there's more (sorry, couldn't resist)
How's that for a fabulous deal?
Good luck everyone ☺
Read more...
Mmmmm, bacon
Saturday, August 20, 2011
I found this recipe while looking at the latest uploads to pinterest and thought immediately that I must.try.this.asap!! Because, of course, it has bacon and eggs and toast and, did I mention bacon? Oh, I did, well, it does and as we all know, if it has bacon, it must be good. :D
Turns out this recipe comes from the Martha Stewart website (should have guessed that one) and is incredibly easy to do, except the part where you have to wait patiently (about 20 minutes) while your breakfast cups of bacony goodness are getting ready in the oven, but it's worth the wait. Trust me.
For my first time, I think they came out pretty darn good. Hubbs and kids loved them. Personally I like them a bit softer, so next time I might take a few out early just for me.

Read more...
Second Harvest
Sunday, August 14, 2011
Just picked another bowl of red currants fresh from the garden. I started this little plant from a 1 gallon container I bought at a garden center a few years ago. I don't have enough yet for a pie or any other recipe that requires more than a couple of cups worth, but we have fun picking them and watching more berries grow each year. In the meantime, I love them on ice cream or in my morning yogurt. Yum!

Read more...
Bite Sized Bits of Yummy Goodness
Sunday, July 31, 2011
I love coffee. A lot. Drink it daily. I am a Starbucks Gold Card holder (got mine before my husband--hehe, sorry sweetie, have to rub it in) Well, as we all know afternoon coffee must have some sort of treat, right? Right? I can't hear you! Just repeat after me: Why yes, yes it does. What kind of treat were you thinking?
I'm so glad you asked. Starbucks started to offer Cake Pops and the whole family loved them. Of course I immediately started to wonder how these were made (don't ask, I'm like that with a lot of stuff) and how I could make them myself (and cheaper, of course).
Enter Google Search (of course--how else can anyone find anything?), type in Cake Pops and the first thing that pops (hehe) up is the Bakerella site. Jackpot! So, for the next couple of hours I got sucked into the yummy world of mini cakey goodness in the form of Cake Pops, Cake Balls and Cupcake Balls. And it just so happened that the first post I see is the announcement for the release of the Cake Pops Book (yay). Off to Amazon to check it out.

- 1 box of Cake Mix - check (I used Lemon)
- 1 can of frosting - check (I used whipped vanilla--yum)
- Pink Candy Melt - check
- Lollipop Sticks - check
- Candy-covered Sunflower seeds (for the ears) - check
- Pink M&M's for the snout - Uh Oh, hitting a snag here--no pink stuff anywhere. Note to self: stock up on pink candy next Valentines Day and/or Easter (and hide them so you don't accidentally eat them). After consulting with a very helpful World Market employee, we came up with Sweet Tarts. OK, that'll work - check
- Edible Ink Pens for Eyes - check
- Prepare the cake mix as directed on the box and let it cool completely.
- Crumble into a large bowl (make sure the little ones wash their hands for this if they're helping)
- Add about 3/4 of the frosting and mix. This is the messy, sticky part, so you may want to use gloves.
- Roll your cake balls. I'm not that good at estimating, so I used a small ice cream scoop. Plus, the kids were helping and this was easier for them. I had them do the scooping and I did the rolling.
- Chill for a couple of hours. If your freezer is big enough, you can put them in there for about 15 minutes (according to the book)
- Melt your candy dip either in the microwave or in a double-boiler. The microwave might sound easier, but I have yet to be able to get it right. The last time I tried to melt chocolate chips for a yummy strawberry dip desert, I couldn't get the stuff to melt, so I kept microwaving it until I ended up with a stinky/burnt/curdling mess (blargh). We don't mention this incident in this family. So, double-boiler it is.
- Now comes the fun part. Dip the lollipop stick into the candy melt (just the tip) and gently push into a cake ball. While it's still wet, push two little pink sunflower seeds into the head for the piggy ears.
- To dry (harden), push the sticks into a block of Styrofoam.
- When the little piggies are dry we can add the snouts. Feel free to test or, you know, dispose of cracked or broken pops. Gotta make sure they, uhh, taste right, right? I just used one of the lollipop sticks to dip into the candy melt, spread some on the snout-candy and apply to pig face--tadaa, almost done.
- All that's left is to add the eyes. Now, here's where I had problems. From what I'd read, you must use the edible ink pens, right? Well, I must have gotten different pens, because they were so hard that they started to dent the candy coating without leaving any ink--rats! Luckily, I had also bought some candy colors, just in case I couldn't get pink. I just used a toothpick dipped in candy color and lightly dab on the eyes (worked great for adding the mouth, too)


P.S.: Like the Frames? They are free from Isabelle Lafrance Photography. Check it out, there are lots of cool freebies, actions and textures.
Hey, it's a Blog-Hop! Amy McMaster from Olive Juice Shoppe started a Fall Recipe Blog Hop and I decided to add my Pink Army of Cake Pop Pigs. This is my first Blog Hop, so I'm excited to see how many great recipes will show up. Add yours today.
I dream in Textures
Wednesday, July 27, 2011
Another week has gone by and another fabulous texture found its way to my collection by way of Kim Klassen's Texture Tuesday email. This time I have two pictures that I think work well with this new texture called Dream.
The first picture is of a Seagull, which I had already been working on with other textures. The dream texture just seemed like the icing on the cake. Hmmm, cake. Sorry, I got temporarily distracted. Speaking of cake, I made some yummy cake pops this weekend. You can see pictures and how-to's on my personal blog (not that this blog isn't personal, but more photography oriented, where my personal blog is, well...personal, you know?)
Anyway, back to textures. Here is the Seagull--if you hover your mouse over the picture, you'll see the original.

Here is a screen-shot of the layers and settings for this image. I used the dream and grannyscupboard textures as well as a lovely overlay from Vera Lim:

And 'cause it was so much fun, I had to do another one. What do you think?

I was going to put the layer screen-shot here as well, but it turned out to be quite long. Let me know in your comments if you'd like to see it and I'll try to stitch it together from multiple screen-shots.
Make sure you stop by the Texture Tuesday Page and check out all the beautiful entries.
 Read more...
Soft and Faded
Thursday, July 14, 2011
It's Texture Tuesday at the Kim Klassen Café. This week's edition is Pretty in Pink and we need to use the Aurora texture. What, just use one texture? Hmmm, don't think I can do that. How about 4 or 5? Yeah, that sounds better. ☺
This is not a new picture. I shot this in September of 2009 at the Olympia, WA Capitol Grounds. The gardens were lovely and I was aiming for the flowers when the bee just happened to fly by--snap, lucky shot. I've posted the original (cleaned up) on my blog and flickrstream before, but I wanted to try to put a softer spin on it--enter Textures.
Hover your mouse over the picture to see the before.

Here's what I used:
- Hue/Saturation Adjustment to desaturate a bit
- Nelly Nero - Modfather and turned on the Pop,Brighten and Fade Highlights and Toning layers
- Textures: k_canvasbackmagic, Screen, 100%; kk_canvasback, Soft Light, 87%; 3 copies of kk_aurora, Linear Burn, 59%, Soft Light, 24% with an Invert Adjustment Layer at 89%, Multiply, 33%; kk_luminous, Screen, 74%
- Then I grouped the texture layers and added a layer mask to bring back a bit of the bee
- Solid Color Adjustment Layer, c4d4c3, Multiply, 18%
- Solid Color Adjustment Layer, f2ebc6, Soft Light, 64%
- The photo frame is from Katie Pertiet from Designer Digitals
Deep Thoughts
Wednesday, June 22, 2011
I discovered this really cool website, Kim Klassen Cafe, which is a fabulous resource of tutorials, textures, and photography tips. Every Tuesday, there is a Texture challenge, which invites people to link to their creations using one or more of Kim's wonderful Textures and encourages them to check out and comment on others' work. I love communities like this; they give you an opportunity to view so many other talented peoples' pictures and be inspired in your own work.
So, this is my first time participating in Texture Tuesday and I was excited to try out two textures, Golden and LifesGood. You can download these by signing up for the Texture Lovin' List. I used a picture of my daughter, Katie, from 2009. Not the best and sharpest, but I really love the concentration on her face and the pose and casual look. It just looked perfect for texture application.
I did some cleanup in Lightroom and then switched it to black and white. Then, in Photoshop, I added both Textures with these adjustments:
LifesGood, Overlay, 42% Opacity, Golden, Soft Light, 91% Opacity. I added Layer Masks to both texture Layers and very slightly brushed over the face with a soft, very low opacity brush. Then I ran Sharp People from the MCP Quickie Collection. Lastly, I applied a frame from OnOne's PhotoFrame (the free version) and that's it. Roll your mouse over the picture to see the before.

Read more...
My very Professional (not!) photo shoot and final picture How-To
Sunday, May 22, 2011
I haven't had much opportunity to use the new tripod, so yesterday I decided to use the potted Campanula Get Mee's (ok, I didn't know this, I read the label) I picked up at the store last week and take some close-ups.
I love this texture tutorial at the Flypaper Textures site and wanted to see if I can get similar results using my own textures. Well, I didn't really have any of my own textures yet; I just started creating my own and the few I have were more of the darker/grungy variety, so they wouldn't work for this light, dreamy type of look.
Well, not to worry, being the Packrat that I am, which, in photography, translates into my having a hard time rejecting and deleting any bad or blurry shots without thinking "hmmm, if I just use this corner of the picture, I can get some cool background/texture, etc. which I can then use for something else", I had just that--some really nice, dreamy, blurry, colorful parts of otherwise less than optimal (i.e. crappy) shots.
This is what the finished picture looks like.

If you'd like to know how I did it, read on:
Spring is here - I hope
Saturday, April 23, 2011
Finally, the days where we get (almost) up to the weather we're supposed to be having this time of year, are getting more frequent. Today is actually the second day in a row we can go outside without a jacket on!! Time to clean the yard and garage--but that's another post.
So, last week we had another such day (imagine that!), so we took the opportunity of a couple of hours before picking the kids up from school and went to the capitol in search of some photo ops. Oh, and to try out the new tripods (and heads
) we got. We managed to get a few decent shots of the capitol and surrounding area. It was still a little early to get any flowers and I'm not sure they'll be having to many this year given the budget issues.
The picture I'm showing below is a combination of two shots I took; one of them had a better DOF for the background and the other had more of the ledge in focus. I did some basic adjustments in LightRoom and then moved on to Photoshop
, where I used a combination of Actions.
I started off with Boost, from the (free) Pioneer Woman Action Set 1 (I seem to always start with that one :D). Then, I used the (also free--yay) Mini Fusion Action from MCP and adjusted the various settings, like contrast, warm tint and then I lightened it a bit.
Then, to bring out the leaf and petal colors on the ledge, I used MCP's Fingerpaint action from the Quickie Collection. Lastly, I added the Dusty vignette from MCP's All in the Details set. And finally, finished it off with the BuildIt Rounded Color Block from MCP's Finish It set. Hmm, can you tell I use a lot of MCP actions? Here is the finished picture.

Contest Time at iHeartFaces
Monday, April 18, 2011
I haven't been entering contests over at iheartfaces lately; don't know why really. I think I've been doing way too much multi-tasking. I'm very impulsive when it comes to information. I see some new technique or inspiration for a picture and I'm off to try it; even if I'm in the middle of two or three other projects.
But, this week's challenge was wind and I knew I had a good picture. Here's a small version of it. You can click on the thumbnail and go over to my photoblog for the full post.
 |
| Katie singing in the wind |
New Photo Challenge - Wind!

 Read more...
Grunge Mix - Vintage
Sunday, April 17, 2011
I spent some time today going through different tutorials for creating textures. One great one I found was Evolution of a Texture. I followed most of the instructions and interpreted others for my own use. I like the way they came out. This article definitely gave me ideas and I can't wait to try out other techniques. I made 5 textures in different shades, all are available to download on my flickr page.
Read more...

Subscribe to:
Comments (Atom)